Support

  • Return & Warranty Policy
  • 30-day money-back guarantee and a one-year worldwide warranty (Sinis Mall will ship you the damaged components for free.).
  • Ortur Firmware Repository(Click here to learn more.)

Product installation video

  • AUFERO LASER 2
  • ORTUR LASER MASTER 2 S2
  • ORTUR LASER MASTER 2 PRO S2
  • ORTUR LASER MASTER 3

Click here to download the latest firmware:firmware for OLM3


Software selection


Google Play (Android)

App Store(IOS)
 

Scan the code to download the APP

APP Name: Laser Explorer

LaserGRBL is a free program that meets the majority of the criteria. This program is advised if you are a beginner player unfamiliar with computers or software. It is straight forward to use and can be picked up fast. (Cannot be used on a Mac)

【Click to download】

https://github.com/arkypita/LaserGRBL/releases/latest/download/install.exe

USAGE:https://lasergrbl.com/usage/


The links below will let you download the different versions of LightBurn V1.1.03:

Windows 64-bit version

Windows 32-bit version

Mac OS version  (Installation instructions here)

Linux 64-bit version (.run) (alternate .7z)

If you ever need to download an older version of LightBurn, all of our previous versions are available here: LightBurn Releases

Tutorials:https://lightburnsoftware.com/pages/tutorials

Support Forum:https://forum.lightburnsoftware.com/

Video explaining the two softwares


If you want to engrave the photos, you can go to this URL to process the photos:
https://www.imag-r.com/

Free engraving & cutting material library download URL: 
https://3axis.co/dxf-files/
https://www.freepatternsarea.com/

Perfect Service System, Let You Easily Become the Master of Laser Engraving Machine

Laser Explorer APP User Manual

  • CONNECT 
  • CONNECT 2
  • ENGRAVING & CUTTING

Mobile phone connected to machine WiFi.
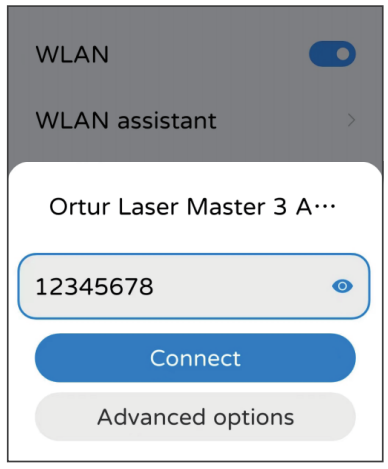
The WiFi name of the machine starts with "Ortur Laser Master 3". WiFi password is "12345678".

Note 1: The mobile phone cannot access the Internet when the machine's WiFi is connected.

Note 2: If there are multiple OLM3s in the power-on state and you can't tell the name of the machine's WiFi, please enter the code "$310" in the console of the control software of the computer, and click Enter to view the name of the WiFi.

Click the options in the red box in order from left to right.

Note : The correct laser module must be selected!

The phone and the machine are in the same local area network.
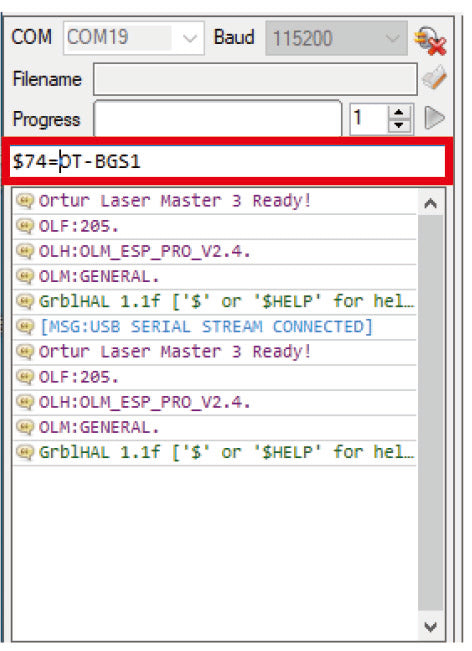
1. Connect the machine to LaserGRBL, enter "$74=WiFi name" in the red box, and then click Enter.
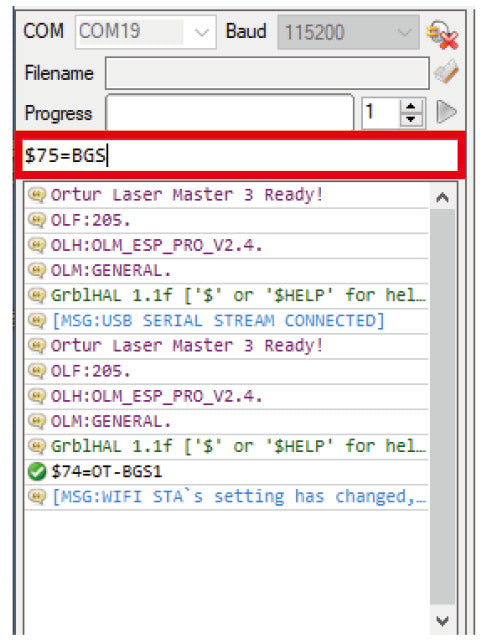
2. Enter "$75=WiFi password" in the red box, then click Enter.
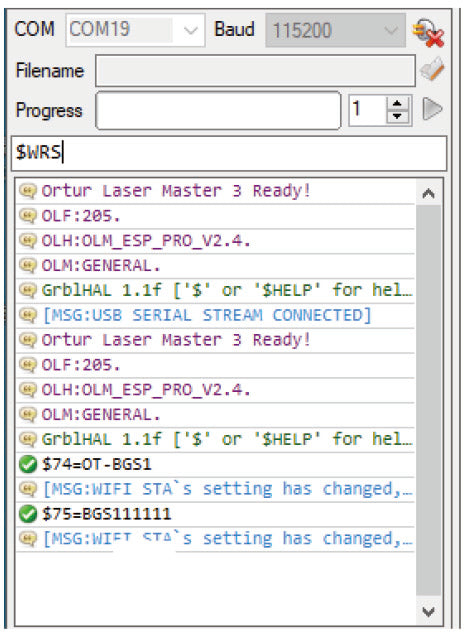
3. Enter "$WRS" in the red box, then click Enter.
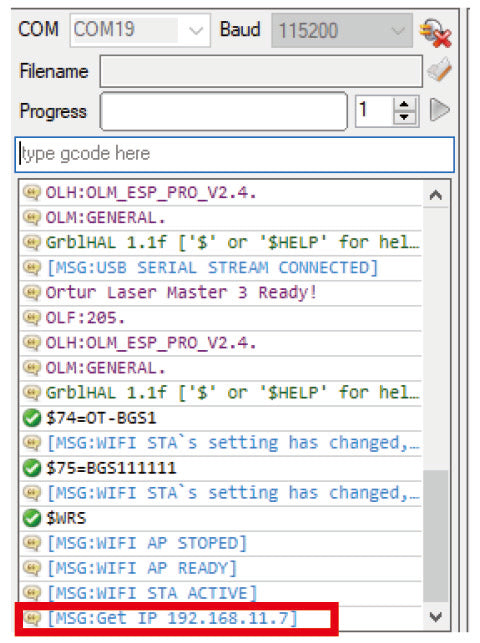
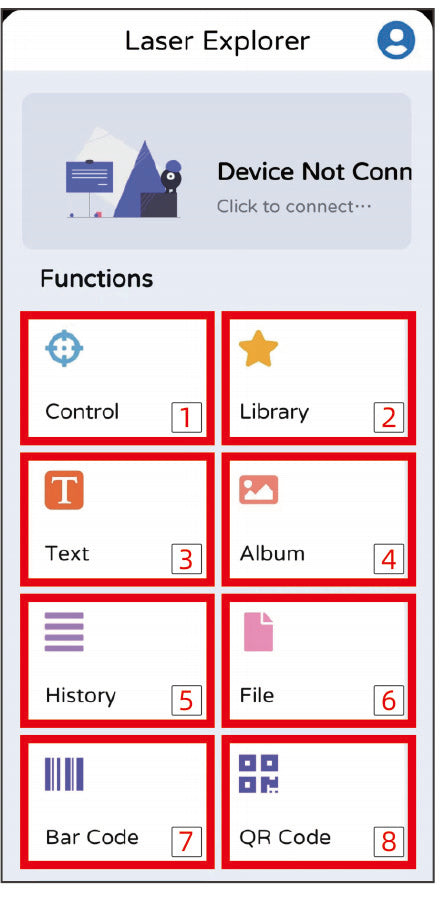
1. Control (Control the movement of the machine)
2.Library (software comes with images to choose from)
3.Text (software comes with a text editor)
4.Album (can view and select images in the phone album)
5.History (used data can be called directly)
6.File (can read engraving file)
7.Bar Code (software comes with barcode editor)
8. QR Code (the software comes with a QR code editor)
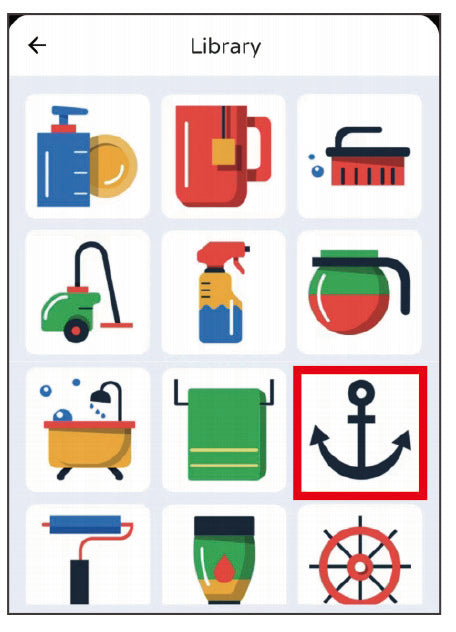
Choose an image arbitrarily.
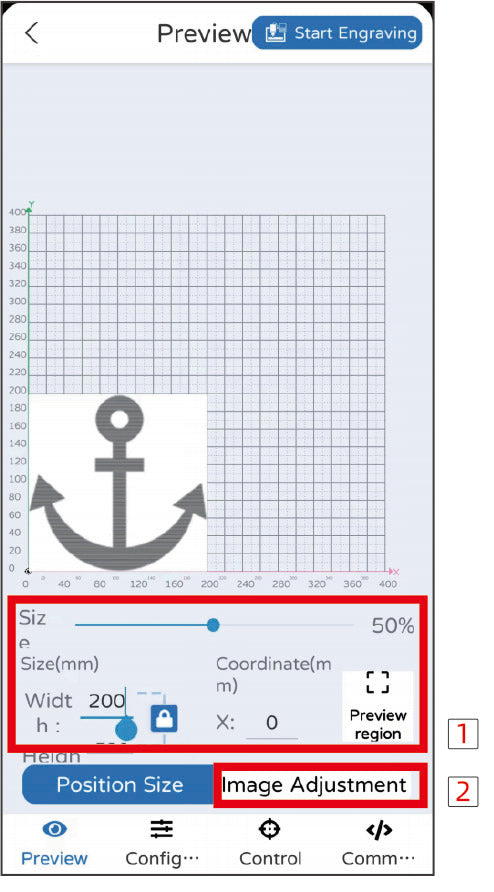
1. By modifying the parameters in the red box, you can change the size and position of the image, as well as the engraving range of the preview image.

2.Modify the parameters in the red box to change the brightness, contrast and black and white limits of the image.

Note: The parameters are for learning reference only, and the actual use will be affected by factors such as material and thickness! Please do more tests according to the actual situation!
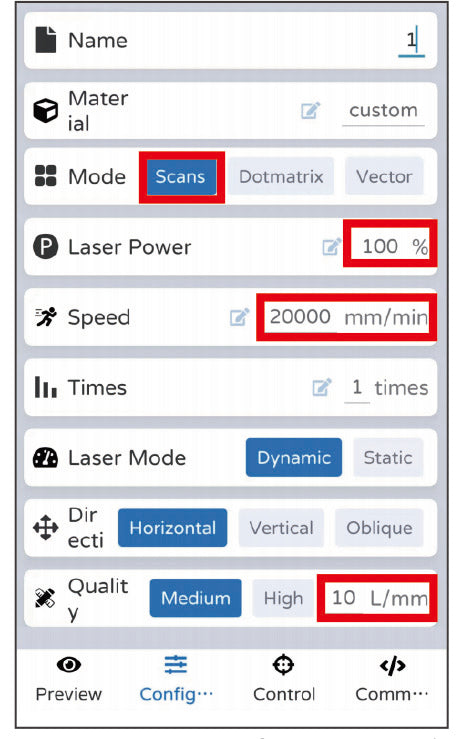
Engraving & Cutting with the web controller 

  • connecting
  • ggode files
  • engraving or cutting
  • 1
  • 2

The machine is connected to the network (must be in the same LAN as the computer)

1. Connect the machine to LaserGRBL, enter "$74=WiFi name" in the red box, and then click Enter.

2. Enter "$75=WiFi password" in the red box, then click Enter.

3. Enter "$WRS" in the red box, then click Enter.

4. The IP of the machine in the LAN.

The phone and the machine are in the same local area network.

1. Open a browser, enter the IP address of the machine, and hit enter.
2.Enter "admin" for the user and password to enter the operation interface.

1. After setting the parameters in the software, click "File" → "Quick Save".

2. Click "Save".

1. Click the button inside the red box to open the saved Ggode file.

2.Click "Open".

Please wait patiently until the file is loaded.

engraving & cutting with LaserGRBL

  • 1.Connect
  • 2.Unlock
  • 3.Engraving
  • 4.Cutting

Click the button in the red box to connect the software to the machine.

Click the button in the red box to unlock the grey buttons.


1. Click the "Import" button
2. Select the engraving image
3. Click "Open"

4. Brightness, contrast, black and white limit adjustment
5. Select "Line to Line Trace"
6. The quality is modified to 10Lines/mm
7. Click "Next"

8. The Engraving Speed is modified to 20000mm/min
9. Select "M4-Dynamic Power" for laser mode
10. S-MAX 1000
11. The size can be modified according to your needs
12. Click "Create"

Note: The engraving parameters are only for learning and reference, and the actual use will be affected by factors such as materials and engraving images!

Click the button in the red box to view the engraving range, and then adjust the position according to the engraving range.

1. Select "Vectorize"
2. Click "Next"

3. The Border Speed is modified to 100mm/min
4. Select "M3-Constant Power" for laser mode
5. S-MAX 1000
6. The size can be modified according to your needs
7. Click "Create"

Note 1: The cutting parameters are for learning and reference only, and the actual use will be affected by factors such as material and thickness!

Note 2: The same material, such as wood, will have different effects due to different tree ages and resins. In order to achieve the best results, multiple attempts are required!

Click the button in the red box to view the engraving range, and then adjust the position according to the engraving range.

engraving & cutting with Lightburn

  • 1.Connect
  • 2.Engraving
  • 3.Cutting

Click the "Create Manually".

Click the "GRBL", then click "Next".

Click the "Serial/USB", then click "Next".

Modify "X Axis Length" and "Y Axis Length" to 400mm.

Select the origin "Front Left", turn on the machine and it will auto home, then click "Next".

Click the "Finish".

Click the "OK"

Select "COM19".

 Connection succeeded.

Click the button in the red box to connect the software to the machine.

Click the "Open" button.

Select the engraving image, then click "Open".

1. Click the "Cuts / Layers".
2. Modify the speed to 20000, "Pass Count" to 1, and "Power Max" to 100.
(Note that the unit is mm/m)

Note: The engraving parameters are only for learning and reference, and the actual use will be affected by factors such as materials and engraving images!

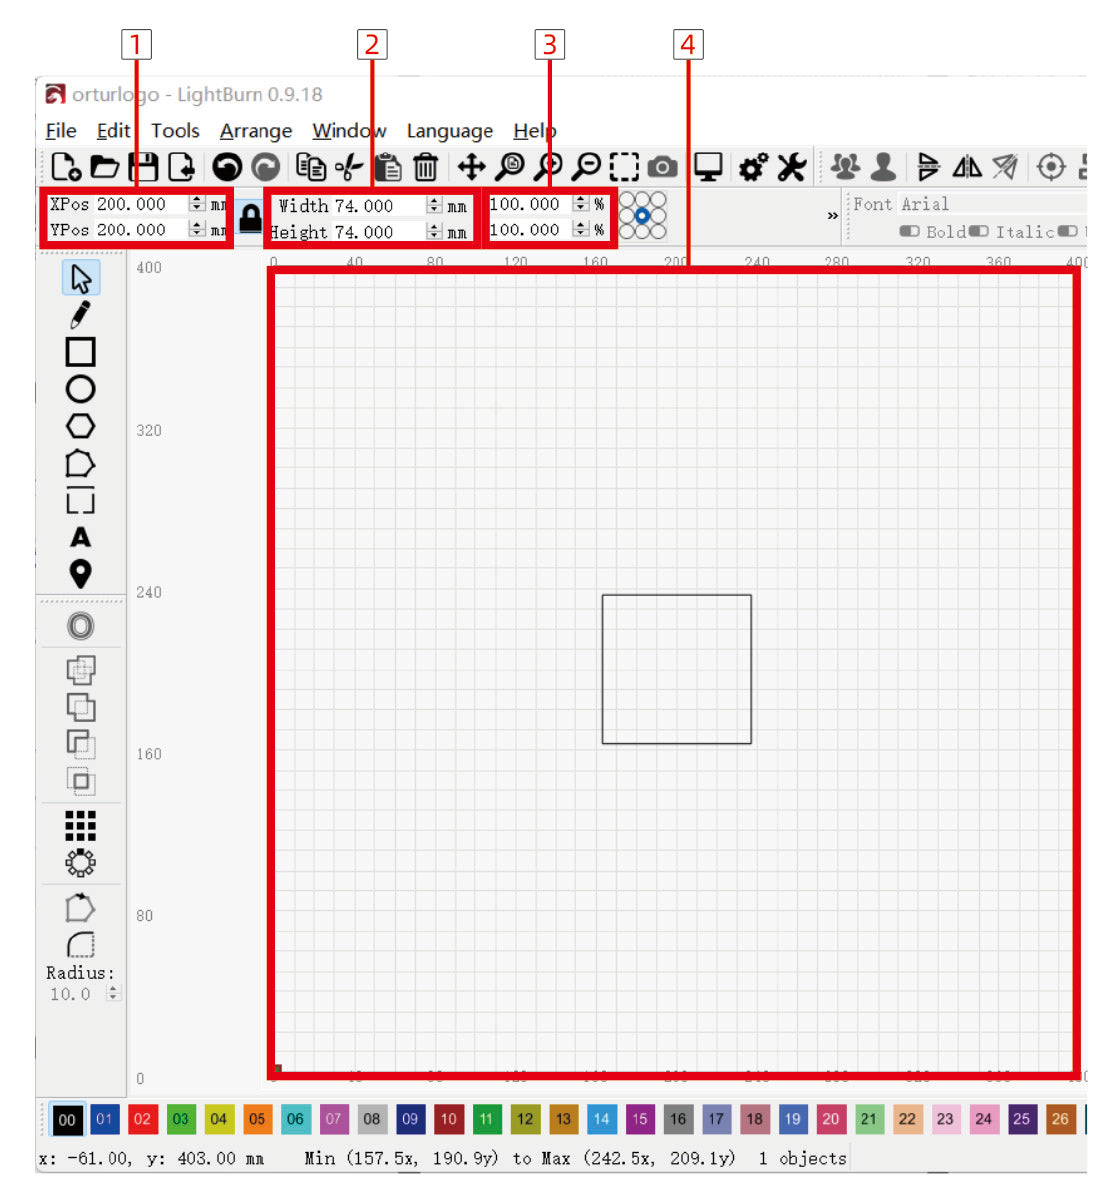
1. The coordinates of the center point of the engraving range
2. Engraving image size
3. Engraving image size ratio
4. The effective engraving range of the machine

You can draw lines using the tools included with the software, or import an existing line file.

The cut image must be lines!

Modify the speed to 100, "Pass Count" to 1, and "Power Max" to 100.
(Note that the unit is mm/m)

1. The coordinates of the center point of the engraving range
2. Engraving image size
3. Engraving image size ratio
4. The effective engraving range of the machine

Click the button in the red box to start cutting.

Click here to learn more: Web UI operation tutorial

Can't find an answer to your question?

Whatsapp:+8616670494147 or email us at support@sinismall.com

Email address*

Your question*

OUR FEATURED PRODUCTS